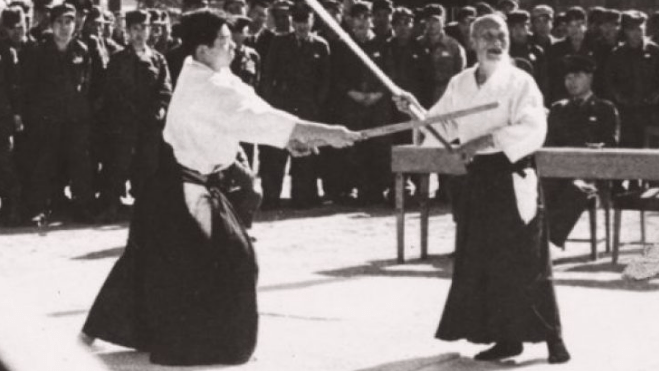
3rd KUMITACHI

Initial Conditions

Both in migi-hanmi, chūdan, proper maai.

Uchidachi initiates with kiri-kaeshi, entering not as a circular action but as a direct threat to the hands. The first target is the thumb. If the line is correct, ukedachi loses the weapon immediately.

Ukedachi must escape without losing the capacity to respond. The form begins already combat-contested.

This exercise isolates close maai under pressure, where each action produces immediate consequence.


Count 1: Opening Cut (Uchidachi kiri-kaeshi)

Problem

Uchidachi’s entry directly threatens ukedachi’s grip.

Uchidachi Logic

Enter decisively from controlled contact. Kiri-kaeshi is a circular dissolve, a dissolution of the line.

Cut on a conical line, controlling space while targeting the hands.

Ukedachi Logic

Escape while maintaining contact as long as possible to control uchidachi’s attack. Do not resist. Clear the hands while preserving cutting alignment.

Hesitation results in disarm.

Principle

At close maai, the hands, not the head, are primary. Defang the snake.


Count 2: Wrist Exchange (Kote for Kote)

Problem

Ukedachi survives the initial entry but creates exposure.

Both are now within decisive range of the wrists.

Uchidachi Logic

Ukedachi’s escape from the initial entry will result in a counter cut. Uchidachi will receive with uchi-komi to capture the blade.

Ukedachi Logic

Return a cut immediately after the initial escape from the initial kiri-kaeshi. Deliver a cut from jodan to uchidachi’s kote.

Do not disengage. Do not create space. You must answer within the same tempo.

Principle

At this range, initiative exists only in fractions. Delay is defeat.


Count 3: Capture and Continuation

Problem

Mutual cutting destabilizes the exchange.

Uncontrolled continuation leads to mutual destruction.

Uchidachi Logic

Withdraw slightly, not to disengage, but to capture the cut to kote with uchi-komi.

Maintain contact. Shift the line and reattempt kiri-kaeshi from the opposite side.

Remain connected.

Ukedachi Logic

Do not allow separation. Maintain pressure through the contact.

Prepare to counter within the bind with another withdraw and counter cut men.

Principle

Separation resets the encounter. Connection resolves it.


Count 4: Final Domination (Kiri-Otoshi)

Problem

Both are committed and connected. A simple cut will not resolve the exchange.

Uchidachi Logic

Deliver kiri-otoshi. Use alignment and body weight to trap ukedachi’s blade and deliver the cut to the centerline.

This is not a simply a finishing blow. It is elimination of options.

Ukedachi Logic

If pressure is incomplete, recover the horizontal line.

The exchange is not finished until escape is impossible.

Principle

Control must remove all alternatives.


Roles, Naming, and the “Feeder” Problem

In my articles, I use the term shidachi (winner) to label the role of the one who dominates at the end. This is a departure from Saito sensei’s nomenclature. His convention is more appropriate for Aikiken:

Uchidachi = initiator, senior role, defines the problem

Ukedachi = receiver, junior role, proves the response under pressure

The form is not about victory. It is about correct action under constraint. I default to the concept of “winning” as a pedagogical short-hand (and because winning is important). The term shidachi introduces outcome bias. It encourages performing the ending rather than understanding the exchange. But I use it to convey the importance of proper focus on targeting and intention to heighten the seriousness of the encounters.

Nevertheless, the traditional terminology clearly establishes the roles in the engagement. A useful parallel exists in Filipino Martial Arts: the “feeder.”

At a low level, the feeder supplies attacks for rote practice drills (high repetition, low pressure). At a high level, the feeder becomes indistinguishable from uchidachi, the role that must establish: correct maai, precise timing, immediate punishment of error, no accommodation.

The difference is developmental. Initially, a feeder suggests cooperation. Ultimately, uchidachi imposes consequence.

Fixed roles risk predictability. Real encounters do not preserve initiative symmetry.

But this is pedagogy which requires defined roles: without asymmetry, there is no clarity. Without clarity, there is no transmission.

The roles are not reality. They are constraints that reveal it.


pp 30-31

Traditional – Saito Sensei presentation

The Chiba lineage that I continue are refinements of the Iwama presentation Saito sensei codification. Saito sensei presents it structurally:

Initial contact is light control of the opponent’s ken

Uchidachi flows with ukedachi’s movement

Ukedachi:

steps back

maintains centerline

Uchidachi:

steps forward with uchi-komi

A tsuki is introduced as a central moment

Uchidachi parries the thrust laterally

The sequence resolves with renzoku uchi (continuous striking)

This presentation departs from Saito in several ways:

Opening Intent

Saito: light contact, controlled engagement.

Here: immediate lethal threat to the hands (thumb destruction).

Effect: Transforms a teaching setup into a combat opening.


Nature of the Exchange

Saito: structured flow, repeatable movement.

Here: escalating kote-for-kote compression.

Effect: Reframes the encounter as a chain of forced decisions, not a pattern.


Role of Tsuki

Saito: central pivot in the sequence.

Here: largely abstracted into close-range exchange.

Effect: Removes a key mechanical disruption in favor of continuous pressure logic.


Ending Logic

Saito: renzoku uchi (continuous attack).

Here: kiri-otoshi as terminal domination.

Effect: Shifts from continuation to resolution.


Underlying Assumption

Saito: the form is pedagogical.

Here: the form is interrogated for combat finality.

Saito’s version preserves the form so it can be transmitted.

This interpretation asks a different question: what is the key target in every beat of the encounter? What is the bunkai that would manifest at each moment?

Saito sensei teaches how to train. This interpretation explores what the training implies.

1st KUMITACHI

Initial Conditions

Both in migi-hanmi, chūdan.

Ukedachi initiates by lifting: creating an opening, an invitation. Raising to jōdan without securing maai draws the kiri-age riposte. This is not a feint in the classical sense; it does not deceive cleanly. It provokes a correct response while exposing the initiator.

The action partially succeeds, it elicits commitment, but at the cost of structure.

This form isolates a specific moment: induced overextension. In practice, this condition arises through error. Here, it is introduced deliberately, so it can be studied.


Count 1: Invitation (Ukedachi raises)

Problem

Ukedachi raises to jo-dan no kamae as if to target a strike men. This is structurally inferior if read literally.


Ukedachi Logic

This is not a committed attack, it is 誘い (sasoi / invitation), or ABD, attack by drawing.

You expose centerline to draw a committed response.

Without this, nothing meaningful happens.


Uchidachi Logic

Do not hesitate.

Cut upward (kiri-age) into the opening to strike the underside of ukedachi’s wrists, simultaneously preventing the shomen.

This is not defensive; it is opportunistic exploitation.


Principle

A real opening must be given for a real response. Without risk, there is no pressure.


Count 2: Displacement (Ukedachi retreats + cuts down)

Problem

Uchidachi has taken initiative.

Ukedachi must now recover while moving backward.

This is already a disadvantage. Behind the OODA loop.


Ukedachi Logic

Step back (left foot), to receive the descending cut with uchi-komi.

This is not a counterattack: it is space recovery + line reset.

You are stabilizing structual posture and alignment.


Uchidachi Logic

From the apex of the kiri-age, re-orient the blade edge, and continue forward, maintaining pressure with a descending cut toward ukedachi’s wrist from the top.

Do not overextend or chase blindly. Your job is to keep initiative alive.


Principle

When initiative is lost, first regain structure.


Count 3: Tsuki Attitude (Ukedachi reorients)

Problem

Ukedachi cannot remain defensive.

Pure retreat leads to collapse.


Ukedachi Logic

From the uchi-komi capture, adopt tsuki kamae and perform kiri-kaeshi to dominate the line.

This is critical: You shift from retreat → threat re-establishment.

Even if you are behind, you must present danger.


Uchidachi Logic

Ukedachi is trying to capture initiative. Sensing the threat and change of pressure, release from the capture to take jo-dan no kamae and deliver shomen.


Principle

Even in disadvantage, you must remain offensively credible.


Count 4: Final Exchange

Problem

Both are now in forward pressure.

This is where most interpretations collapse into choreography.


Ukedachi Logic

Cut down again: attempt to reassert line control.

But structurally, you are behind.


Uchidachi Logic

From the kiri-kaeshi, release the intention of a cut early and use ukedachi’s release as a rebounding energy to take jo-dan no kamae and deliver kiri-otoshi.


Principle

The winner is not the first to cut.

It is the one who can sustain pressure without breaking structure.


This also is a refinement by Chiba sensei of Saito’s original presentation.

Traditional Aikido Vol 2, Advanced Techniques, Morihiro Saito, pp 24-25

The key distinction is uchidachi’s conclusion: to drive through with renzoku uchikomi. vs Chiba’s kiri-otoshi. The distinction is pedagogical.

Saito concludes with renzoku uchikomi, continuous, driving pressure. The final cut does not guarantee victory because structure degrades, timing slips, and both practitioners remain present. Under those conditions, the only thing that matters is the ability to continue without collapse.

Renzoku uchikomi is uninterrupted viability. Do not stop. Do not disconnect. Do not assume success. The fight does not end when you believe it should. It ends when continuation is no longer possible.

Chiba ends all kumitachi with kiri-otoshi. Not as flourish. As doctrine.

Where Saito allows the exchange to continue, Chiba imposes a demand: at some point, continuation is failure. Pressure alone is not enough. Persistence, without resolution, becomes evasion. Kiri-otoshi is not simply a cut. It is the refusal to remain in uncertainty. In this sense, Chiba is not more aggressive. He is more absolute.

Done without proper intention and orientation, renzoku can degrade into mechanical continuation, chasing without control, pressure without conclusion. The practitioner never finishes.

Kiri-otoshi demands: precision, timing and structural dominance. But if you miss the moment there is nothing behind it but collapse. Kiri-otoshi provides clarity, you cannot hide your failure. Chiba sensei refined the kumitachi for pedagogical clarity.

Ultimately, renzoku assumes the fight continues. Kiri-otoshi denies that assumption. Saito teaches how not to stop. Chiba teaches that, eventually, you must.

The lesson I take from Chiba sensei’s refinement is: at some point, continuation is failure. Or in my voice:

You cannot win by defending

There must be: a moment of truth, a final line, a decision, and he imposes that across all kumitachi by adopting the same conclusion: kiri-otoshi.

4th KUMITACHI

This is aiki-ken. It assumes coherence: both players recognize initiative, distance, and line. Real encounters do not grant that clarity. Entries will be broken, timing will be stolen, and the first mistake will often be the last.

The 4th kumitachi teaches a specific response to a thrust. A straight thrust can be decisive, but it is also the most dangerous moment in kenjutsu: you are extended, your weapon is compromised, your opponent is structurally intact.

A koryū critique would hold, if maai and timing are correct, the first tsuki ends the exchange. But this is not presented as kenjutsu, though it borrows from its constraints and consequences. It is not modeling combat outcome. It is modeling: connection under pressure, continuity through failure, sensitivity to line and timing. The sword makes error explicit.

The lesson is not how to win, it is how not to disconnect. And what to do once a disconnect if felt.


Initial Conditions

Both in migi-hanmi, chūdan-no-kamae (seigan-no-kamae)

Ukedachi lowers to gedan-no-kamae.

This creates an opening from the midline for the opening thrust – an opening that is also a trap.

Count

#1 – Chūdan Tsuki

#2 – Suppression / Line Break

#3 – Hidari Tsuki (uchidachi recovery)

#4 – Men / Kiri-Otoshi (decisive finish)


COUNT 1: Chūdan Tsuki

Problem

Because the maai is already established at close range, whoever owns centerline first can end the exchange.

Ukedachi Logic (Initiator)

Initiate with a direct tsuki to the trachaea. The kissaki is vertical and delivered as a thrust without telegraphing – a JKD “straight blast”

The structure is extended. That is the cost of initiative.

Uchidachi Logic (Receiver)

Do not block. Allow the blade to rise slightly, receiving the thrust on the belly of the sword, then redirect with a camming press-check downward.

The body shifts slightly off-line as the blade rotates from ukedachi’s outside line to inside line.

You do not beat the weapon; you change its path and orientation.

At the base of the press, your sword is on top: structurally dominant.

Principle

Initiative creates exposure. Control of line immediately becomes contested.

COUNT 2: Suppression / Line Break

Problem

Ukedachi’s thrust has failed and now is controlled downward.

If uchidachi resists, structure collapses and the exchange ends.

Uchidachi Logic (control phase)

Maintain pressure, but do not overcommit.

The goal is not to win the bind, it is to force the opponent into a predictable recovery.

Overextension forfeits control.

Ukedachi Logic (recovery begins)

Do not push back. Do not resist or try to reclaim the line through strength.

Instead: allow the downward pressure to continue, continue to maintain connection to feel blade position and pressure, and at the bottom of the press, release the bind and immediate hanmi change.

The sword drops, but the body reorganizes.

Principle

The moment you fight pressure directly, you lose both structure and time. Yielding preserves optionality.


COUNT 3: Hidari Chūdan Tsuki

Problem

Ukedachi has lost the original line and is momentarily exposed.

Recovery must occur before uchidachi converts control into a finishing cut.

Ukedachi Logic (recovery attack)

Shift to hidari-hanmi and re-enter on a new line.

Deliver a second chūdan tsuki from the opposite side toward uchidachi’s kidney.

This is not a reset, it is a continuation from a broken structure.

The power is identical: rear leg drives, hips align, back hand delivers

But the geometry has changed. You are now attacking from outside the original line of suppression and the blade is now flat (parallel to the ground), more lateral; a different problem for uchidachi.

Uchidachi Logic (adhesion + counter)

Retreat and absorb the thrust with uchi-komi. Do not disengage: adhere.

From this connection, initiate kiri-kaeshi to the thumb.

This is the moment of maximum opportunity.

If the timing is correct, ukedachi is cut here.

Principle

If the line is lost, change the line. If connection is maintained, opportunity persists.


COUNT 4: Men / Kiri Otoshi

Problem

Ukedachi has reasserted attack, but uchidachi has already initiated a counter (thumb cut). Both lines now exist simultaneously. Whoever controls the final line survives.

Ukedachi Logic (commitment to resolution)

Do not disengage prematurely.

Maintain connection just long enough to read uchidachi’s riposte, keep forward pressure and connection long enough to sense the extension, then release and step through immediately to jo-dan no kamae to deliver a decisive men cut.

The sequence is continuous. No reset. No chamber. The cut is not added: it is revealed through continuity of motion.

Uchidachi Logic (Kiri-Otoshi decisive)

As ukedachi releases to cut, recognize the moment of disconnection. The void signals danger. So, align vertically into jōdan-no-kamae and cut directly through center with kiri-otoshi. This line does not block or receive; it redirects through alignment and dominates the center.

Ukedachi’s cut is collapsed at the moment of expression.

Uchidachi’s timing is later but the structure is superior. Uchidachi enters in go-no-sen and resolves in sen-no-sen; not with speed, but through structural dominance.

Ultimately, kiri-otoshi arises not from seeing the attack, but from sensing the inevitability from the release.

Principle

The moment of release is the moment of greatest danger.

Final initiative is not owned: it is proven through line control.


This presentation of the 4th Kumitachi is an evolution from Chiba sensei who was taught the forms by Morihiro Saito. Saito sensei’s presentation is slightly different:

Traditional Aikido Vol 2, Advanced Techniques, Morihiro Saito, pp 32-33
Native parsimonious pedagogy

As presented by Saito, this is a compact instructional sequence: thrust (tsuki); suppression (press down); non-resistance (flow); line change (hidari tsuki); resolution (uchikomi). It is intentionally minimal, designed to be learned physically, not explained conceptually.

Chiba sensei expanded the pedagogy, and I have refined it further with the logic of bunkai (targeting purposefully).

Viewed attentively, the initial thrust is not just an attack, it is a necessary overextension. Loss of center is built into the form and the practitioner must operate from a compromised position and in a time deficit.

Because weapons are involved, the maxim, “Do not resist” is not philosophical. Key principles of Aikido emerge as somatic lessons: Resistance = structural collapse; Yielding = preserved awareness and optionality

The exchange is not broken between counts. Continuous contact enables: pressure sensing, timing recognition, and correct re-entry to the center line.

And the single most important lesson is: release is loss of information, therefore exposure, and it demands immediate action.

Saito’s version resolves with uchikomi. Chiba’s refinement introduces kiri-otoshi as structural conclusion – and he concludes all six kumitachi with the same sequence.